
When I played drums, I used the biggest drum set possible. When I played golf, I used three wedges because the pros do. When I cook, there are multiple burners on at once and I can’t share the kitchen.
I am an expert at complexity, and I’ve been working to remedy that.
It’s why I try to cook everything in one pan now. It’s why I’m trying to simplify my workouts to be as straight forward as possible. And it’s why I’m telling you about an exercise I first learned about 10 years ago.
Recently, I’ve fallen in love with the leg lowering exercise all over again, and I want to share it with you.
Why leg lowering?
If you ever feel “tight” in the hamstrings, want to open up your hips, prepare for squats or deadlifts, or it just feels so good to stretch, this exercise might be just what you’re looking for.
Let’s get into the details:
What is leg lowering? As the name suggests, the leg lowering exercise involves… lowering your leg. Seriously, it’s this simple:
When you’re performing the leg lowering exercise you lay on your back with your feet in the air, support one leg with a band, and lower the other leg to the ground. It looks pretty simple, right?
Here’s the catch: The goal is to move your leg without moving anything else.
Lower your leg without moving your other leg, your hips, your back, your shoulders, your head, or checking your phone. That control is harder than it looks.
In my belabored examination of complexity, I’ve realized that there several exercises that have fallen out of fashion are actually fantastic for almost everyone. I believe that leg lowering is one of them.
As fitness coaches continue our education, we replace old ideas with new ones and I think that in my circle of coaches, something as simple as leg lowering isn’t in vogue anymore.

Leg lowering isn’t the newest exercise, but it may be new to you, so here’s a run down of what’s going on:
How to Leg Lower (as an exercise)
When you first lay down on the ground, roll your lower back towards the ground. That creates a posterior tilt of the pelvis, which I prefer for this exercise. That’s not the position we want during the deadlift, but setting and maintaining that position helps us resist an anterior pelvic tilt as the leg drops down.
Resisting extension is key to happiness. In your spine, at least.
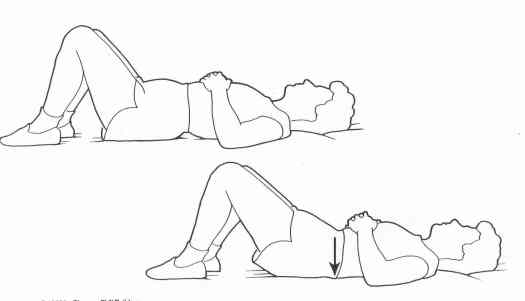
The easiest shift to make is to shift your hips while lifting your feet off the ground. Go slow, and mind that there’s no gap under your lower back. If it helps, lay down on a towel, and try to slide it out. It should stay put beneath you.
Once you’re set, lift both legs up looping a resistance band around one foot. It doesn’t have to be a band; a towel, belt, or yoga strap can work just as well. You should have your back flat on the ground, and the bottom of your shoes are aimed at the ceiling now.
From here, one of two things might happen:
- Sometimes it feels like a big stretch in the hamstring of the leg that stays up, intensifying while the other leg goes down. If this happens, great. Keep going.
- Sometimes, there’s no stretch in the hamstring. Like, no sensation at all. If this happens, great. Keep going.
This move doesn’t actually have anything to do with stretching your hamstrings. It’s totally fine if you feel a stretch, and I know it feels damn good when I feel that. That sensation is fine, it’s just not the goal of the exercise.
The goal of the exercise is to keep one leg up while the other goes down. The leg that’s staying up? It’s Michelle Obama.

You’re basically reaching with the heel of your shoe to touch the ceiling above you, and the baseboard in front of you. The band on your foot helps maintain this position. Eventually, you may develop the control to give it a go without the band.
Once you’ve mastered the band supported version, try it without the band. You’ll notice in this demo that:
- I’m very pale
- Both of my legs are slightly bent throughout the exercise, and I’m totally okay with 10-15% of a bend in your knees, provided you maintain control over the pelvis.
- I used to listen to music that can be pretty frightening if you’re not prepared for it.
Great, so you’ve seen two variations on leg lowering, an exercise which helps you practice maintaining the position of your pelvis while your legs are moving. Now let’s talk about when the hell you should do this.
When leg lowering is a good idea:
- During your warm-up as you address mobility of the hips, stability of the lower back, and control over your pelvis as a whole.
- As active rest between sets of a hinging exercise, like a deadlift.
- In a cool down to relax after higher intensity exercises, like the aforementioned deadlifts, or something repetitive such as running or cycling.
- When you’re laying down and need to acknowledge someone but waving with your hands is too damn hard.
Leg lowering isn’t very complicated, which is why I forgot about it in the first place. Now, I remember that’s why I love it so much. You lay down, set up your pelvis, and keep it there while moving your legs.
It’s that simple, and a great addition to a warm-up, into a workout as active rest, or into a cooldown, when controlling your hips is advantageous. (Hint, it’s always advantageous.)
I’ve let you know all of the big rocks about leg lowering, and I’d love to know how it goes for you. Give this one a try, and let me know how it feels when you do it!


Leave a comment